Sunday 13 July 2014

C&G level 2, Module 3 Chapter 4 completed

Fastenings

Items that need fastenings;

Shoes - a strong felt ball through and elasticated loop
Coats & jackets - felt balls, paper or card strengthened rolled 'buttons'
Bags - loops and balls; cords and buttons, tabs
Purses - loops and felt buttons, tabs
Notebooks - loops and felt buttons, cords, tabs

I will make notes in my small notebook as I think through what I will create for my assessment piece which I have not decided yet.

Cords

I made stitched cords using zigzag stitch. I tried using a straw to guide the core through from front to back but personally feel that I have more control doing this without the straw, foot on and dogs up. Sometimes the zigzag gets a little bit lumpy and I have to raise the presser foot to ease past the 'lump'.


Page 19 - Cords 

The top cord was red thread zigzagged over black gimp
The second cord was stitched twice with red metallic and a variegated red thread over red gimp core
The third cord was lengths of green tones of sari silk stitched together and zigzagged with a metallic two thread yarn
The fourth cord is orange wool doubled and stitched with gold metallic thread in the bobbin and a variegated thread on top
The fifth cord is dull brown wools x 3 zigzagged with beige and brown threads
The bottom cord is a pale metallic core zigzagged with metallic threads top and bottom

Stitched cords can be used to stitch over a bag seam to give an edging particularly if they have been plaited or knotted together to give depth and added interest. They are useful for securing purses, bags and notebooks. 

Braids

I used three yarns and laid them side by side then stitched over them with a zigzag stitch top image
The second braid is three lengths of wool stitched together using a zigzag variegated thread
The third braid is made with the same three lengths of yawn stitched with an automatic pattern
The fourth braid is made form two lots of three lengths of wool both stitched together with an automatic pattern then stitched together, making six lengths of wool stitched together with the same automatic pattern
The wools used for the core of the orange samples are shown at the bottom


Page 20 - Thread Braids

Fabric braids


Page 20 - Fabric braids with sari silk

Three lengths of sari silk were stitched with an automatic pattern and the edges frayed 

Page 21 - Three torn strips of calico as fabric braids

Calico was stitched with the same automatic pattern using different threads and then torn and frayed to make fabric braids


Page 21 - Three pieces of black felt as fabric braids

Three pieces of black felt were stitched with different automatic patterns in different colours. I particularly like the top image and will use the loopy patten again. The bottom lime green on black looks good and could be used successfully on a bigger piece, perhaps cuffs of a jacket


Page 22 - Yarn stitched together with automatic pattern

These yarns were very loosely constructed and I thought that they might be interesting to stitch together. A range of automatic patterns were chosen to make this piece.


Page 22.

A piece  of random dyed felt and a piece of random dyed cotton were stitched using a pretty loopy automatic pattern with a toning variegated thread. The buttonhole was made controlling the hole, then the tab cut and the upper folding down element edged with zigzag. The bottom edge was folded up to ensure that the tab and hole met at the correct place and the bag made with zigzag stitch again in the same variegated thread. 

I would have made two buttonholes but broke my buttonhole connection to my machine, so one buttonhole had to make do. 


Page 22

Lots of issues with this piece. I didn't support the felt so it's quite wobbly. It's only three inches square, so fiddly. I had broken my buttonholer, so made the buttonholes manually, which I hand't done for years. However, I decided to make a go of it and made a paper button from previously block printed paper which I then strengthened with acrylic wax. and made four, not very good, buttonholes; two on the flap and two on the bag. The flap was stitched with zigzag (mmm) and the base folded up and stitched to construct the bag ensuring that the buttonholes met in the right place. The paper bead was used to hold the bag closed.

Paper buttons

I made some paper buttons, rolling them straight and triangular; I used kadi paper that had been printed, paper from an Indian book, tissue paper and wallpaper

These samples will be stored in a box, so no page number - photo in book page 23

I used Pritt stick to secure the and rolled them on the table.

Felt buttons
These will be stored in a box - photo in book page 23

I made these large and small buttons from a range of wool tops - the bottom right grey and brown balls were made from un-dyed sheep's wool, the little pink and black was merino pink and the black was silk. This one was the most difficult to felt.

These samples will be stored in a box - photos in book page 23

Flat felt buttons. These were not hugely successful but are firm and could be used to secure a bag or a jacket quite well

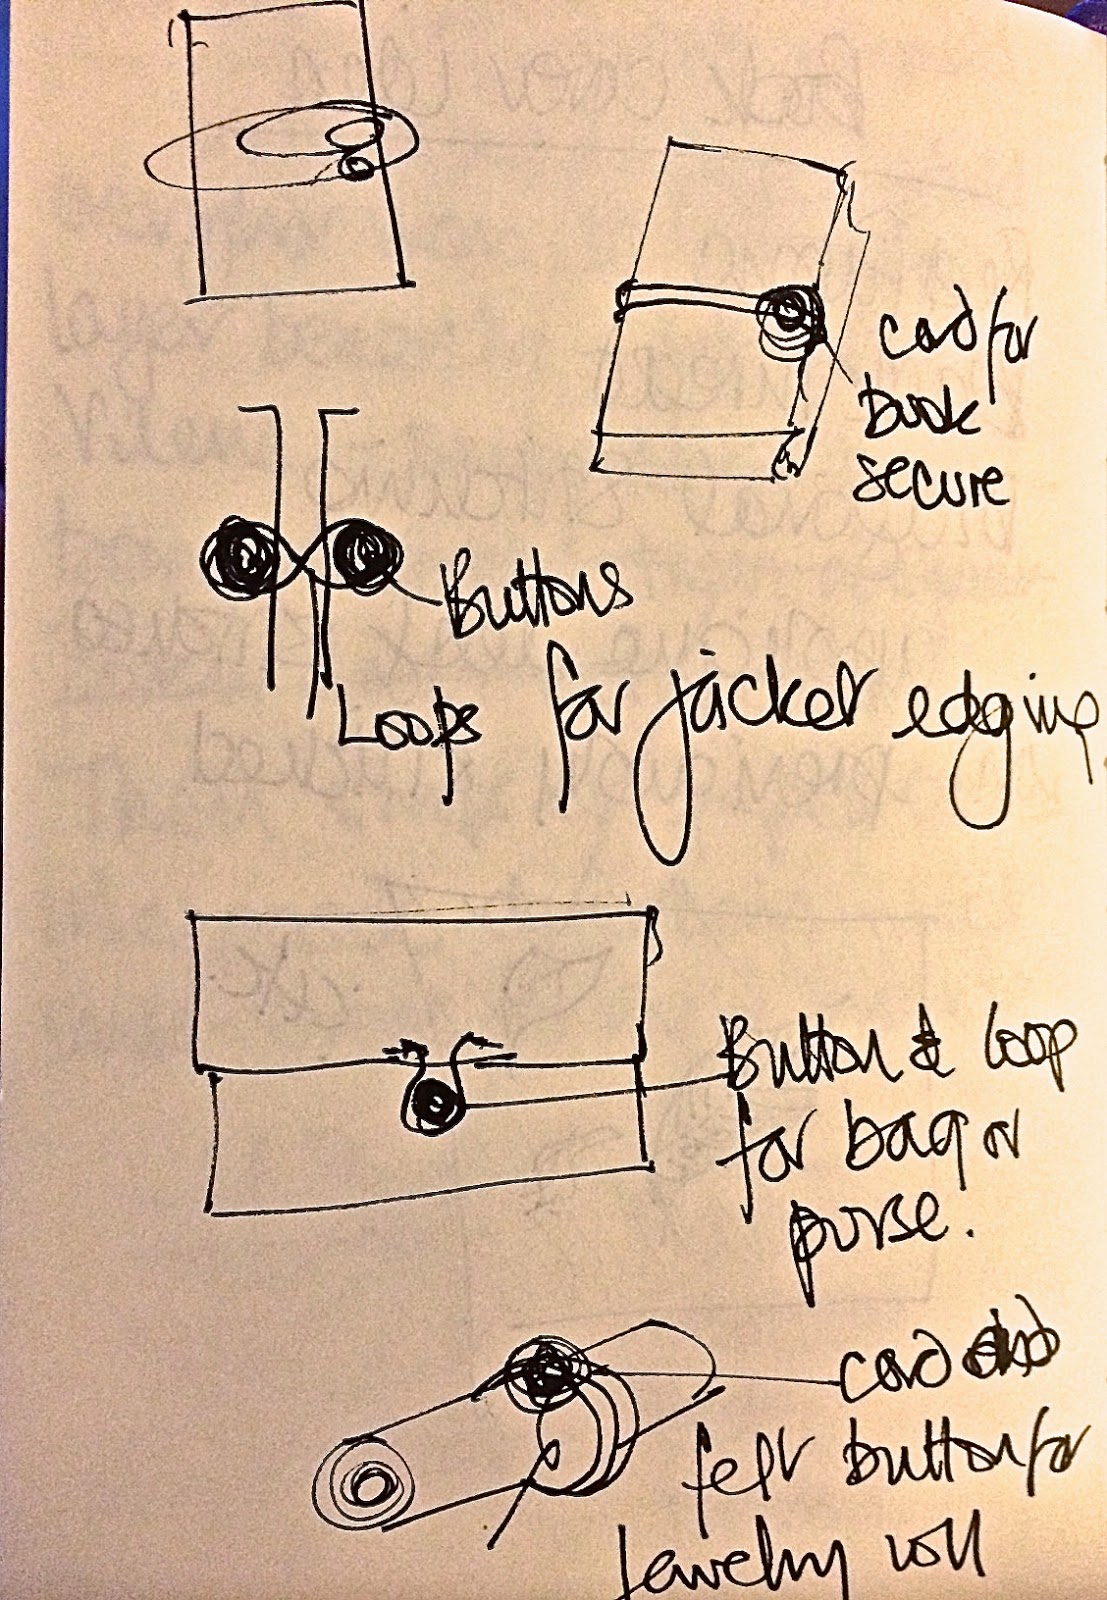
My ideas for weber some of the fastenings created in this chapter might be applied were drawn in my small note book for a book with bead and cord, a jacket with loops and felt buttons;  felt buttons and loops for a bag or purse and cord and felt buttons for a jewellery roll - picture below


Ideas for fastenings - photo Page 23


Thursday 3 July 2014

C&G Level 2 Module 3 Chapter 3 complete

Fancy edges

Bound edges
A piece of calico was cut on the bias 10cm on the diagonal and a piece 10cm long. Decorative automatic pattern stitches were added to the pieces and the bias piece applied to the rectangular with straight stitch and hand stitched at the back with the raw edges turned in


Sample 1 page 14

Bound edge with pin tucks
A piece of fine cotton was used for this piece with a contrasting fabric for the twin needle pin tucks. Two shades of thread were used in the needles. My machine does not seem to make very sharp pin tucks. I added a piece of cord into the bias edging and attached it to the automatic pattern stitched rectangular piece. In order for the cord which was possibly too thin, to stay in place, a row of straight stitching was added close to the cord.


Sample 2 Page 14

Burnt edges
I used a piece of curtain fabric as a base, then added a piece of kinin felt and finally some toning organza. Twin needles and an automatic looping pattern were used round the edge and then in small sections. The organza and kinin felt were then burnt through with a soldering iron and the exposed areas were stitched with free and automatic foot on stitching.


Sample 3. Page 14

Free embroidered burnt edges
A piece of kinin felt was free embroidered with a variegated thread using whip stitching and stitched with an automatic pattern at the edge which was then burnt back to the stitching with a soldering iron.


Sample 4 Page 15

A piece of felt was covered with organza, both random dyed; then stitched with automatic patterns and burnt back between the rows of stitching and amongst the fingers of the patterns.

Sample 5. Page 15

I used the left over transfer paints from sample 5 and dyed a piece of cotton, covered it with a sheer, stitched down with free and foot down embroidery and then  burnt back some areas of the sheer. 

Sample 6. Page 15

Corded edges
A piece of felt was stitched with an automatic pattern and then with two cords attached directly to the edge and each other with a zigzag pattern. 

Sample 7. Page 15

Lengths of gimp were directly attached to a piece of automatic pattern stitched calico. The gimp edgings were secured to each other with zigzag stitching


Sample 8. Page 16

A piece of hessian with free stitching in black and red threads was edged with knotted string using a zigzag stitch


Sample 9. Page 16

A piece of felt was stitched with automatic patterns and an automatic pattern used to attach a cord directly to the edge


Sample 10. Page 16

A piece of felt with cord looped up to the fabric and attached with a zigzag stitch


Sample 11. Page 16

The same piece of felt as 11 this time the cord was looped away from the fabric


Sample 12. Page 16

The same piece of fabric as used in sample 6 was free and automatic pattern stitched in toning variegate thread. Gimp was applied both in the centre of the fabric and at the edge


Sample 13. Page 17

Wired edges
A doubled piece of net was used ad automatic pattern stitched in tonal thread. Wire was attached directly to the edge and then in from the edge and zigzag stitched to secure.


Sample 14. Page 17

Automatic pattern applied on the bias and both free and automatic patterns on the rectangle


Sample 15. Page 17

A piece of kinin felt with satin stitch applied near the edges and burnt back to the stitch edge. Then other colorised kinin felts were automatic pattern embroidered and cut back, then applied using straight stitch. The felt (base) was also patterned and a piece of automatic patterned felt was knotted and applied


Sample 16. Page 17

Lettuce edges
A piece of stretchy fabric was transfer printed and then stretched and satin stitched along the long edge to create the wobbly effect. I did find this tricky.


Sample 17. Page 17

Decorative edge with paper.
Pieces of calico were stitched and torn into strips. A second piece of calico was stitched with automatic patterns and edged with automatic satin stitch. A piece of tonal wallpaper was stitched and then attached to the fabric piece and then torn pieces were stitched, knotted and applied


Sample 18. Page 18

Eyelets and buttonholed edges
A piece of felt was edged with an automatic pattern and cut back to the stitching. Eyelets were made and cord made with zigzag in the same variegated thread as the eyelets and edging over gimp and an automatic pattern stitched at the top of the piece. The cord was threaded through the eyelets.

Sample 19. Page 18

A piece of calico was folded and and automatic pattern stitched with a variegated thread. Eyelets were made and a piece of organza stitched with two rows of the same variegated thread and threaded through the eyelets


Sample 20. Page 18

A piece of random dyed and block printed cotton was stitched with buttonholes at different levels; these were folded to the back of the piece. A few lines of automatic pattern were added and the same pattern used on a piece of organza which was cut back to the stitching and into two lengths, one threaded through each differently spaced row of buttonholes


Sample 21. Page 18

Two rows of diagonally spaced buttonholes were made and small strips of organza stitched in threads matching their colours. These were then threaded through the rows of buttonholes, the middle pieces alternating between the bottom and top rows


Sample 22. Page 18

Layered lettuce edges
Three strips of transfer painted stretchy fabric were satin stitched and stitched to a lettuce edged longer layer


Sample 23. Page 19

This piece of black net was edged with a made cord, satin stitched with a fold in the net. The top of the net was then folded and stitched again with automatic patterns and corded with made cord which were incorporated and embedded with the patterned stitching. A fourth made cord was tunnelled through between the rows and the whole piece gathered and secured to create what could be used as a cuff for a garment.


Sample 24. Page 19

This was an interesting chapter. I look forward to progressing to fastenings.