Monday 23 March 2015

Module 5 Chapter 5

Shadows.

The questions was asked, "what uses shadows?" so I thought of my list including the suggestions of sundial and shadow puppets.

Churches and cathedrals use light to create atmosphere - columns and arches and stained glass all create atmosphere. Galleries and museums also use light and shadow to exhibit work in the most advantageous situations

Woods and gardens with areas of shade create the correct environment for some plants. Creepy films use shadow to scare you; ancient man used light and shadow to tell the time of year, the solstices and the passing of time - such as at Stonehenge.

Bedrooms are most restful in shade; parasols, umbrellas and sunshades all provide shade to relax.

Many artists use shade to create atmosphere. Those whom I especially like are Caravaggio, Rembrandt, da Vinci, Vermeer and Velasquez and I have downloaded some pictures of their work and others.


Page 21. Images using shadow

I found some evocative poems which describe light and shadow. They are both sad but also beautiful and words from them can be used to create atmosphere in stitch


Page 21. Poetry about light and shade

Creating shadows

Craft wire was shaped into a shape too complex to stitch, so shaped again this time like a star from the Starry night work


Page 22. Craft wire shapes and shadows

The shadows from each are drawn and a more simple shape used for stitching


Shapes of shadows. 

I took the simple shadow of the star as my shadow image to use for the paper, fabric, thread work

Paper as a shadow

I used black cartridge paper as a base layer, silver fibrous tissue paper and waxed white tissue paper were used as the layers and silver thread on the top, black thread on the bottom used to stitch the three together. Then small areas were cut away to reveal the black beneath.


Page 22. Paper 

Fabric as a shadow

I made two samples using fabric. The first was based with black felt to stabilise, then black satin, pale blue organza, stitched and burned to reveal the black layer, then white organza layered over and stitched with metallic variegated thread. 


Page 22. Fabric

Fabric 2

The base was Vilene, then chiffon shapes as shadows covered with a layer of white chiffon and stitched with silver metallic thread on top and white on the bobbin.


Page 22. 
Stitch as shadow.

I used the star shape and stitched it three times; once with black thread, once with black and gold threads in the same needle and once with variegated gold thread all in granite stitch. The background fabric is chiffon supported on vilene with a vermicelli stitch. 

I mis-read the brief and didn't add the translucent layer until later in my book where I attached a layer which can be raised to show the sample beneath.


Page 23. Stitch as shadow.

Development

Line to define areas. Using mark-making exercises from Module 1 Chapter 8, I took and image from the internet of light through leaves as a) there was no sun, b) no broadleaf trees in leaf in March. Using LL framing I found ad interesting area and traced it to stitch'n'tear and stitched the outline of differently shaded areas. 


Page 23. The image with area to be used cut away


Layers stitched and cut away

I used five layers of organza with Vilene as a stabiliser and having stitched the outlines, cut away through the layers to the colour best able to describe the areas of light and shade. Then fine and thick lines were stitched to create the light and shade in the image.


Page 23. Line to define areas
Stitch and line as shadows

An image from the internet was chosen and the design transferred to a black supporting felt. The pieces of organza were secured to the felt with temporary spray adhesive. Then a layer of organza was overlaid over all the areas and stitching done. When completed the black felt was exposed using a soldering iron to cut away the layer of organza


Page 24 The source image


Page 24. The stitched image

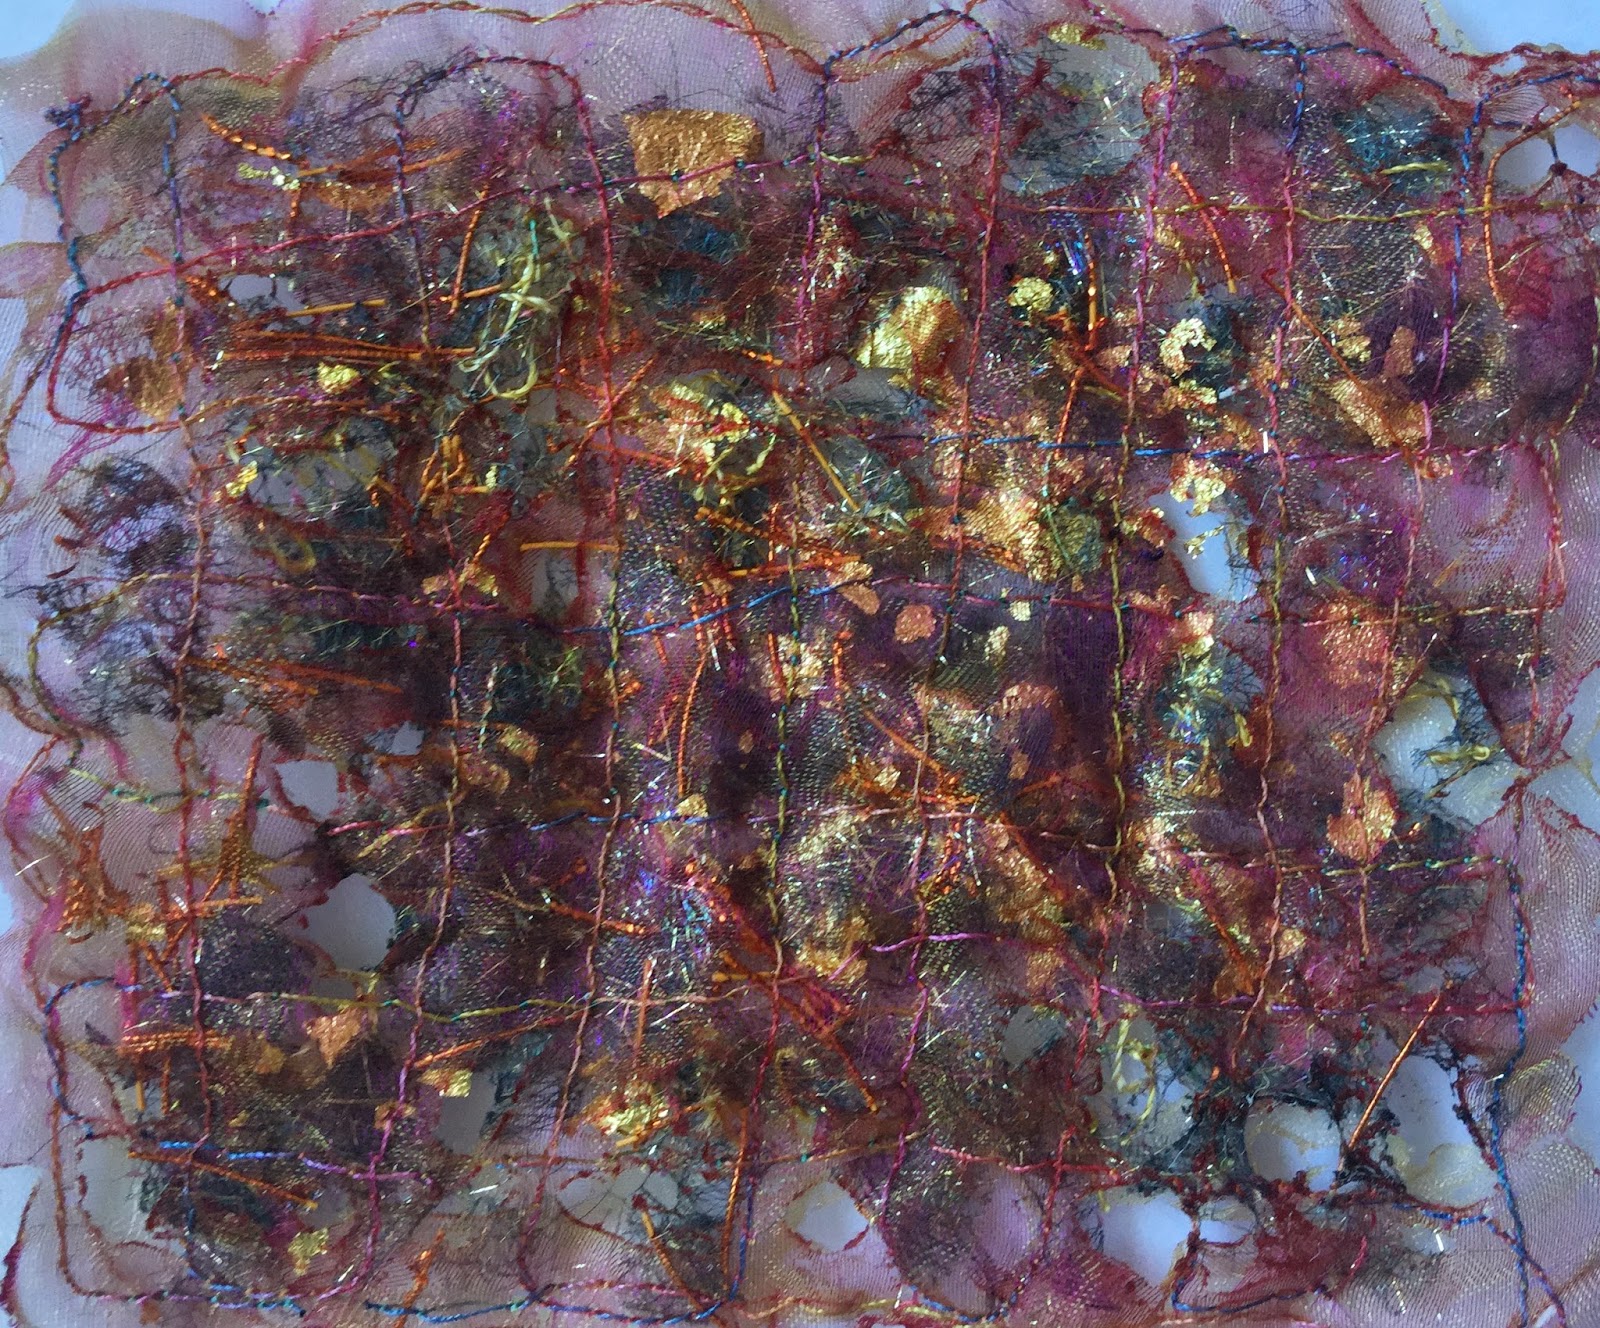
Violet and yellow are opposites on the colour wheel so I used yellow and purple net an trapped threads, silk rods, silk tops and tribal nylon between the layers. The piece was stabilised on stitch'n'tear and and bit of a grid stitched to hold in place. Then each area was stitched with an automatic pattern in the same colour as the layer. In a couple of areas two threads were used in the needle. I had hoped to create depth and light, but not sure if this worked, though. A shotgun was applied to burn through where it would work and the edges were sealed with a flame. Some gilding wax was applied to the yellow area on the left.


Page 25. Experiment with light and shade

Monday 9 March 2015

Module 5 Chapter Four completed

Chapter 4 - In between

The Starlight Night by Gerald Manley Hopkins is full of imagery. I did have to look up a couple of words. "Abeles" are silver birch or aspens. Now, they are very stitchable, but I didn't.

The whole meaning that the poem said to me was about a wonderful starlit night where the eyes of elves are sparkling in a dark wood. The scene seems to be a barn near a farm cottage surrounded perhaps by an orchard where there are trees in blossom in March; as they now are.

I believe that that this poem speaks to me of the nativity in a stable and I am sure that I have read, because of the astrology, calendar changes etc - the birth of Christ may have been in March.

So, this resolved sample had for me, to refer to the nativity, the woods, the blossoms and the stars.

I wrote my plan on which I very roughly sketched my ideas and which elements they referred to.


Plan from my notebook

and I selected the range of fabrics that would work with the plan. More were added later and some weren't used.


Fabric selection for the sample.

The base layer was a purple/dark blue chiffon which was Bondawebbed to pelmet Vilene. As this was a starry night, I thought that the moon would also be visible but didn't want it to be too bright, so from a pale satin, I cut a circle to depict the moon and Bondawebbed this to the chiffon base. 

I love Russian iconography so printed an icon to paper. I cut away the halos and replaced them with a piece of gold kid leather in the same shape. 


The madonna and child were then covered with gold satin and a layer of gold organza 


Then some dark blue and gold Angelina were fused and placed where my stars would be, to form a sparkly base. The moon was shrouded with 'clouds' made from organza 


These basic layers were then all covered with a navy blue net and a metallic dark blue sheer


The foundation of the piece.

I slipped a piece of copper coloured organza over the icon, to depict the barn then I'm afraid, I really got into stitching the piece and forgot to take photographs until I'd completed it. Gold leaf 'stars' were also sprinkled around the Angelina top left.

In my notebook I had written, "Star" - pin tucked net with layers of Angelina and organza and gathered or ruffled into a circle and then irregular cuts to form a rough star-shape. Colour ? red/gold.

I stitched down the top layer and burnt through to the icon exposing the face and the leather halos. Some gold trilobal nylon was stitched into burnt holes to appear like the radiating light from the Madonna and Child. 

Layers of organza and net were cut or burnt through to expose the layers below and stitched down around the burns and cuts with granite and vermicelli stitching. Some snippets of a pink metallic fabric were stitched under an added layer or green blue organza to depict the 'March blooms". 

Also from the notebook, using words from the poem, I wrote, " down in the dimwoods", and decided to make a tree from crumpled brown paper and fused little torn up pieces of Bondaweb to it's surface, heated it to distort, allowed it to cool and pasted with PVA glue then sprinkled with gold and silver embossing powder and heated, then gilded when cooled with gilding wax to add light sparkles, "the diamond delves - elves' eyes". This was made, the first time that I had tried the technique. I stitched the tree to the piece and covered it with  green/blue chiffon which was stitched on and then cut in places with a soldering iron to exposed the gilded bark.

I made the star by first pin-tucking gold metallic net with twin needles and metallic threads. The stitching looped in an interesting way and I decided to continue as it didn't detract from the base layer of the star that I was making. A second layer of dark blue and gold fused Angelina was cut into 'star' shapes and stitched on top of the net which had been gathered and stitched onto the base. Then two layers of gold/red organza were cut into a 'star' and held to seal their edges over a flame and then offset against each other and stitched on top of the lower two layers. 

I felt that the moon was too dim but didn't want to risk cutting or burning through to see if it would look better if more visible as this was an action that I couldn't reverse, so instead, using a silver metallic thread outlined the moon to make it more visible. 

I then edged the piece with a machine 'blanket' stitch. All the stitching was done with metallic threads.


The finished resolved sample

On refection. I know that I am very literal and find it hard to be totally abstract but am pleased with this piece. My husband says that the tree looks like a penguin - ever helpful!!


Saturday 7 March 2015

Module 5 Chapter 3 completed

Chapter 3 - Trapped.

So, I needed to shop! I did have fun finding a good range of sheers, nets and paper and all the other bits I thought would work. They now occupy the spare bed.


Sample 1

Fabrics

I had taken a photo of a beech tree and used a leaf as a potential source. so using the newspaper and spray method I made a sandwich incorporating some soft wire to create veins in the leaf. In the finished sample, the veins didn't show so I cable stitched some gold cord to represent the veins. The sample was then scorched with a flame which represent the decay of autumn leaves.


Sample 2 Front


Sample 2 Back 

I used a ripples in water as the source image and used the newspaper and spray method to hold the pieces down and made the fabric sandwich with two layers of organza trapping little snippets of organza, I didn't have any chiffon, between and then stitched on top and burnt into the sandwich to expose some of the lower layers. 


Sample 3 

I didn't have a photograph to use as a suggestion for using nets, so used the same type of process in the chapter. I used four layers of net, bottom white, middle - two shades of blue and top a metallic gold and between the layers, placed stripped dyed silk cocoons and then free machined between the pieces. 


Sample 4

Using a beech tree photograph, I trapped little pieces of gold leaf between layers of organza as well as strips of a metallic fabric (black and gold) to depict the trunk and branches. The outline was then stitched to hold the gold leaf with metallic thread on the top and bobbin


Sample 5 front and source


Sample 5 back

I made another sample with gold leaf and snippets trapped between two layers of metallic organzas. I used a grid in non-metallic thread to hold the pieces and then scorched with a flame to show through the layers


Sample 6 back


Sample 6 front

Paper

I had to go and find suitable serviettes - Father Christmas was never going to do! Angelina was fused and the serviette stripped to two layers. I thought that I'd stitch the Angelina and used two metallics. Ambitious! I got some lovely whip stitch though. 


The Angelina for the sandwich

The serviette was stitched with a variegated thread and then elements of the Angelina were exposed and the serviette cut back to the stitched element


Sample 7 stitched


Sample 7 Angelina exposed


Sample 7 Cut back

I took a lovely photo in New York of windows with building refections and decided to use this as my source. 

I used a piece of thinnish white paper and acrylic waxed it to give it a bit of strength. This was folded in half to make the sandwich and fused Angelina was put between two layers of dark blue organza. The organza layers were stitched with metallic threads in a grid pattern. I also placed a piece of thin mica beneath the top layer of paper which was then stitched with black thread in the top and bottom to represent the window framing and the paper torn back to expose the organza and mica. A bit like Stitch'n'tear the little bits of white had to be picked out from the stitching. Areas were burnt back to expose the Angelina

The retained paper was then painted with interference medium, but it doesn't show up very well.


Sample 8 

Finally a layer of gold and a layer of yellow organza became the sandwich between which snippets were trapped by using vermicelli stitch to hold then and then little areas were stitched with the same threads in granite stitch and some other areas with metallic granite stitch and some of the layering burnt back. 


Sample 9

Great fun! I really enjoyed this chapter 


Monday 2 March 2015

Module 5 Chapter 2 completed

Module 5 Chapter 2

All that Glistens - experimenting with metallic threads

Well, despite going out to get more metallic threads, I still don't have a huge number but enough variety no doubt to move ahead


My little stash of metallics

Stitching with metallic threads

Well, I had a lovely free day so spent the day stitching. Much frustration with the threads some of which broke under speed but I persevered. 

The first sample was straight stitch altering lengths of stitch and on the same piece of black felt supported by pelmet Vilene satin and zigzag altering stitch length and width. No problem with this gold thread.


Sample 1 and 2


Sample 3

Sample 3 was layers and layers of zigzag. I used a range of colours and had issues with some of the threads, not with others. I found the ones that look like floss frayed out quite quickly and constantly needed re-threading.

Layers and layers of automatic pattern. This was fun, I used stronger threads this time and had few breakages. Then coloured thread in the bobbin and metallic on top with the top tension tightened to pull the metallic through. I stitched these on the same piece of felt. I didn't feel that this piece worked quite so well.


Sample 4 and 5

Samples 6, 7 and 8 were to play around with straight and automatic patterns on three different fabrics
The first sample was stitched on black felt, the second on calico and the third on organza supported with pelmet Vilene 


Sample 6


Sample 7


Sample 8

Free embroidery

I used a metallic thread in the bobbin and a matching coloured thread on top and tried to whip stitch but with little success. I could get little flecks of the pale blue metallic coming through but not enough to make much of an impact. I looks like a hare (unintentional)!


Sample 9

Vermicelli and granite stitch all in metallics


Sample10

I stitched some random vermicelli in a variegated metallic thread and then using other metallic threads in-filled with granite stitch. I particularly like the gold (bottom right) and am going to get more of this as I can see me using a lot of it in future, and it doesn't break all the time!

Free embroidery layered metallics - some of these broke every few stitches - so it's not a huge sample 


Sample 11

Using one of the Module Three Chapter 7 samples using directional stitching I used a variegated metallic thread and stitched a similar sample again. On reflection, I should have used black felt as a support.


Sample 12

I used Janet's ideas and my own images to stitch the 'what if' samples.

The design source was the soap suds image from the first chapter of this module. I stitched the bubbles using a variegated thread that worked for the spectrum reflections in bubbles and water soluble fabric as a support. I am pleased with the result - I got bubbles!


Sample 13

The next exercise was to stitch on velvet using a water soluble support and using an image from Chapter One as the source, so I chose a galaxy, one of many from my sources and stitched using three metallic threads.


The source image


Sample 14

Backgrounds

A comparison between light and dark backgrounds was made using a light coloured and dark coloured felt as bases and the same variegated metallic thread to stitch from the source photo of a tree reflected in water.


Sample 15 and 16

Using the same detail as Janet from the Van Gogh' s 'Starry Night' and not reversing the design, I used a gold coloured cord and dark blue chenille cable stitching from the back of the piece which was supported with pelmet Vilene. Then the lovely variegated gold thread used before was used on the right side to pick up some more metallic detail. I rather like this. 


Sample 17

A twin needle was used with dark and light blue metallic against black felt to emulate ripples on water. 


Sample 18

Then a gold metallic thread and a yellow/gold ordinary thread were threaded through one eye and reflections in water were emulated - the ordinary thread gave up first....


Sample 19

Reflection of the spectrum on a pillar was used to inspire the next piece of stitching. It was only when I cropped this photo that I spotted the fly or spider on the pillar - I didn't stitch it... but using colours to try to catch the same shades as the refection, I used free zigzag and then lightly overstitched with the variegated gold thread


Sample 20

An interesting day of stitching.